Archive for the ‘Japanese’ Category

Japanese Input on Ubuntu 16.04 LTS Xenial Xerus

Sunday, August 20th, 2017

This tutorial will show you how to set up Japanese input IME (日本語入力方法) on Ubuntu Linux 16.04 from the Unity interface so you can type in Japanese in all your favorite Ubuntu applications.

Setup Procedure

To start, select Dash home from the Unity Launcher.

ubuntu15-04-1

From the Dash home, search for Language Support.

ubuntu15-04-2

Select Language Support.

ubuntu15-04-3

Note: If you get the language support is not installed completely dialog box at this point, press Install to install them now.

ubuntu13-04-4

On the Language tab of the Language Support screen, press Install / Remove Languages…

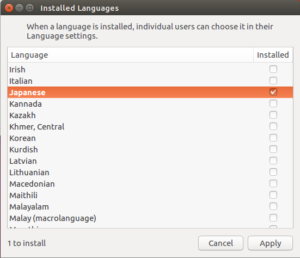
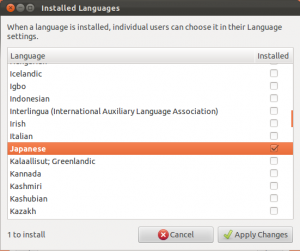
On the Installed Languages screen, scroll down to Japanese and check Installed, and then press Apply.


Enter your password on the Authenticate screen.

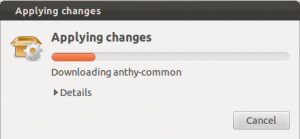
It will take a few moments to download and install the Japanese IME packages.

Back on the Language Support screen, select IBus for the Keyboard input method system, and then press Close.

ubuntu13-04-5

For these settings to go into effect, you must log out and log back in.

Ubuntu13-10-6

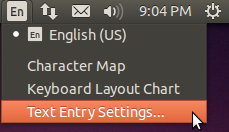
After logging back in, click the language icon from the top panel and select Text Entry Settings…

Ubuntu13-10-1

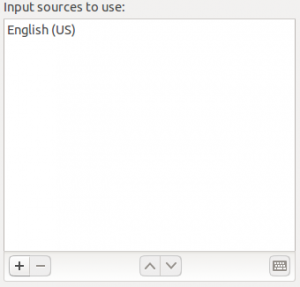
On the Text Entry screen, click the + icon on the button left of the Input sources to use area.

ubuntu13-10-2

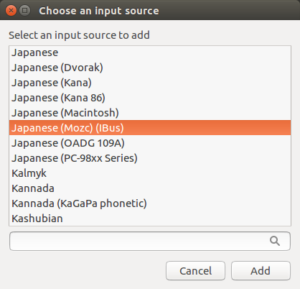
On the Choose an input source screen, scroll down and select Japanese (Mozc) (IBus).


Press Add.

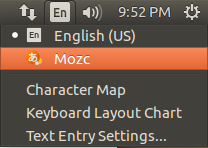
The Japanese Mozc input method will now be available from the language icon in the top panel.

Open up any application with a text box such as Text Editor and place the cursor in the text box.

Press the language icon on the tap panel and select Mozc.


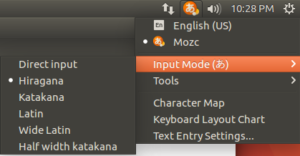
The language icon will now change to the Mozc あ icon.


Press the Mozc あ icon to select the desired Japanese input mode.

That’s it. You can now type in Japanese in Ubuntu 16.04. お疲れさまでした。

Japanese Input on Ubuntu 15.04 Vivid Vervet

Sunday, May 24th, 2015

This tutorial will show you how to set up Japanese input IME (日本語入力方法) on Ubuntu Linux 15.04 from the Unity interface so you can type in Japanese in all your favorite Ubuntu applications.

Setup Procedure

To start, select Dash home from the Unity Launcher.

ubuntu15-04-1

From the Dash home, search for Language Support.

ubuntu15-04-2

Select Language Support.

ubuntu15-04-3

Note: If you get the language support is not installed completely dialog box at this point, press Install to install them now.

ubuntu13-04-4

On the Language tab of the Language Support screen, press Install / Remove Languages…

On the Installed Languages screen, scroll down to Japanese and check Installed, and then press Apply Changes.

Enter your password on the Authenticate screen.

It will take a few moments to download and install the Japanese IME packages.

Back on the Language Support screen, select IBus for the Keyboard input method system, and then press Close.

ubuntu13-04-5

For these settings to go into effect, you must log out and log back in.

Ubuntu13-10-6

After logging back in, click the language icon from the top panel and select Text Entry Settings…

Ubuntu13-10-1

On the Text Entry screen, click the + icon on the button left of the Input sources to use area.

ubuntu13-10-2

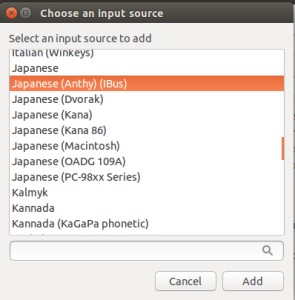
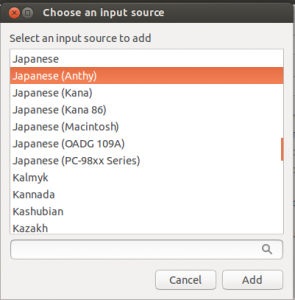
On the Choose an input source screen, scroll down and select Japanese (Anthy) (IBus).

ubuntu15-04-4

Press Add.

The Japanese Anthy input method will now be available from the language icon in the top panel.

Open up any application with a text box such as gedit and place the cursor in the text box.

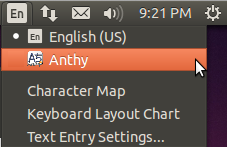
Press the language icon on the tap panel and select Anthy.

Ubuntu13-10-4

The language icon will now change to the Anthy Aち icon.

Ubuntu13-10-5

That’s it. You can now type in Japanese in Ubuntu 15.04. お疲れさまでした。

Japanese Input on Fedora 21 Linux

Saturday, February 14th, 2015

Setting up Japanese input IME (日本語入力方法) on Fedora 21 Linux under the Gnome 3 environment is quick and easy, and can even be done during the initial setup process. It is the same method as the previous Fedora 20 release.

This quick tutorial will show you how to set up Japanese input.

Japanese IME Setup Procedure

To start, open Activities from the Top Panel.

In the Search Box, type Region & Language and select Region & Language.

fedora19-1

On the Input Sources section of the Settings screen, press the + in the lower left corner to add a new keyboard input source.

fedora19-2

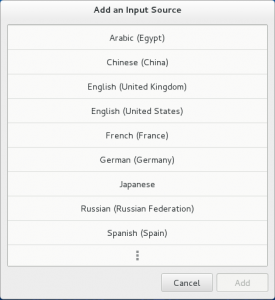
On the Add an Input Source screen, select Japanese.

fedora19-3

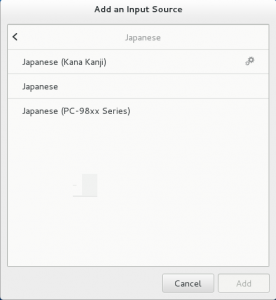
On the next Add an Input Source screen, select Japanese (Kana Kanji).

fedora19-4

Press Add.

Close the Region & Language menu.

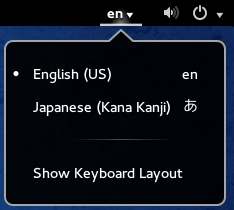
You should now have the input language menu in the top bar. The en displayed means English keyboard.

fedora20-1

Press it and select Japanese (Kana Kanji) to change to Japanese Input.

fedora20-2

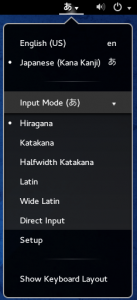
The en should have changed to a katakana あ to indicate Japanese input.

fedora20-3

That’s it. You can now type in Japanese.

fedora18-8

Press the katakana あ in the top bar while in Japanese input mode to toggle between various input modes and typing methods.

fedora20-4


Japanese Input on Ubuntu 14.10 Utopic Unicorn

Saturday, February 14th, 2015

This tutorial will show you how to set up Japanese input IME (日本語入力方法) on Ubuntu Linux 14.10 from the Unity interface so you can type in Japanese in all your favorite Ubuntu applications.

Setup Procedure

To start, select Dash home from the Unity Launcher.

ubuntu13-04-1

From the Dash home, search for Language Support.

ubuntu13-04-2

Select Language Support.

ubuntu13-04-3

Note: If you get the language support is not installed completely dialog box at this point, press Install to install them now.

ubuntu13-04-4

On the Language tab of the Language Support screen, press Install / Remove Languages…

On the Installed Languages screen, scroll down to Japanese and check Installed, and then press Apply Changes.

Enter your password on the Authenticate screen.

It will take a few moments to download and install the Japanese IME packages.

Back on the Language Support screen, select IBus for the Keyboard input method system, and then press Close.

ubuntu13-04-5

For these settings to go into effect, you must log out and log back in.

Ubuntu13-10-6

After logging back in, click the language icon from the top panel and select Text Entry Settings…

Ubuntu13-10-1

On the Text Entry screen, click the + icon on the button left of the Input sources to use area.

ubuntu13-10-2

On the Choose an input source screen, scroll down and select Japanese (Anthy).

ubuntu13-10-3

Press Add.

The Japanese Anthy input method will now be available from the language icon in the top panel.

Open up any application with a text box such as gedit and place the cursor in the text box.

Press the language icon on the tap panel and select Anthy.

Ubuntu13-10-4

The language icon will now change to the Anthy Aち icon.

Ubuntu13-10-5

That’s it. You can now type in Japanese in Ubuntu 14.10. お疲れさまでした。

Japanese Input on Linux Mint 17 Qiana (Cinnamon)

Tuesday, July 29th, 2014

This tutorial will show you how to install Japanese input IME (日本語入力方法) in Linux Mint 17 under the Cinnamon desktop environment. Japanese IME is required to be able to type in Japanese. There are a few steps to get it working, but it is not hard. Let’s start.

Click on the Mint Menu and select Software Manager from the left menu.

Linux Mint 16-1

linuxmint15-2

If the Enter your password to perform administrative tasks dialog box appears, enter your system password and press OK.

In the Software Manager, search for ibus.

linuxmint15-3

Select ibus by double clicking it.

linuxmint15-4

Click Install.

Linux Mint 16-2

Software Manager will now download and install IBus in the background.

linuxmint15-5

While IBus is installing, search for anthy.

linuxmint15-6

Select ibus-anthy by double clicking it and click Install.

Linux Mint 16-4

Software Manager will now download and install ibus-anthy in the background.

When the activity bar on the bottom shows 0 ongoing actions, installation is complete.

linuxmint15-15

Close Software Manager.

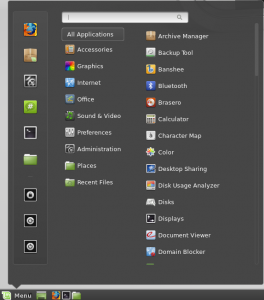
From the Mint Menu, select to System Settings – Control Center.

linuxmint15-8

Open Languages.

linuxmint15-9


On the Language Settings screen, select Install / Remove Languages….

If prompted, enter your administrator password and press OK.

Click the Add button.

linuxmint17-1

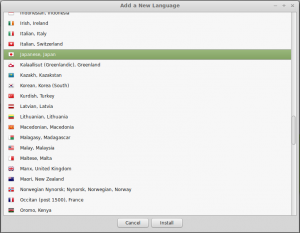
Scroll down and select Japanese, Japan, and then press Install.

linuxmint17-12

Back on the Install /Remove Languages screen, if Japanese says Some language packs are missing, select Japanese and press Install language packs.

linuxmint17-16

The language files will download and install. This may take a few minutes.

After installing, Japanese will now say Fully installed. Press Close.

linuxmint17-3.png

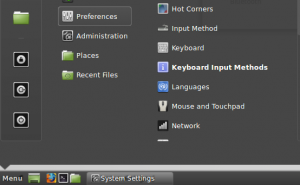
From the Mint Menu, select Preferences -> Keyboard Input Methods.

linuxmint17-4.png

If you get a popup saying Ibus is not running, press Yes to start it.

linuxmint17-5.png

linuxmint17-6.png

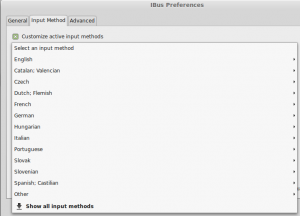
From the Input Method tab of the IBus Preferences screen, click Customize active input methods.

linuxmint17-7.png

Click the Select an input method drop down and click Show all input methods.

linuxmint17-8.png

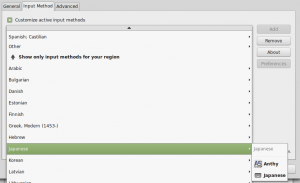
Scroll down and select Japanese -> Anthy.

linuxmint17-9.png

Click Add. Then click Close.

The input method keyboard icon should now appear in the bottom bar.

linuxmint17-10.png

Open a text editor and place the mouse cursor in the editor.

Click the input method keyboard icon and select Japanese – Anthy.

linuxmint17-11.png

They input method keyboard icon will change to the Anthy Aち logo.

linuxmint17-13.png

Click the Anthy icon to select the input mode.

linuxmint17-14.png

You should now be able to type in Japanese.

linuxmint17-15.png

Note: Sometimes you have to log out and log back in after setting up Anthy initially to get it to work.

Japanese Input on Ubuntu Linux 14.04 LTS Trusty Tahr

Sunday, May 25th, 2014

This tutorial will show you how to set up Japanese input IME (日本語入力方法) on Ubuntu Linux 14.04 from the Unity interface so you can type in Japanese in all your favorite Ubuntu applications.

Setup Procedure

To start, select Dash home from the Unity Launcher.

ubuntu13-04-1

From the Dash home, search for Language Support.

ubuntu13-04-2

Select Language Support.

ubuntu13-04-3

Note: If you get the language support is not installed completely dialog box at this point, press Install to install them now.

ubuntu13-04-4

On the Language tab of the Language Support screen, press Install / Remove Languages…

On the Installed Languages screen, scroll down to Japanese and check Installed, and then press Apply Changes.

Enter your password on the Authenticate screen.

It will take a few moments to download and install the Japanese IME packages.

Back on the Language Support screen, select IBus for the Keyboard input method system, and then press Close.

ubuntu13-04-5

For these settings to go into effect, you must log out and log back in.

Ubuntu13-10-6

After logging back in, click the language icon from the top panel and select Text Entry Settings…

Ubuntu13-10-1

On the Text Entry screen, click the + icon on the button left of the Input sources to use area.

ubuntu13-10-2

On the Choose an input source screen, scroll down and select Japanese (Anthy).

ubuntu13-10-3

Press Add.

The Japanese Anthy input method will now be available from the language icon in the top panel.

Open up any application with a text box such as gedit and place the cursor in the text box.

Press the language icon on the tap panel and select Anthy.

Ubuntu13-10-4

The language icon will now change to the Anthy Aち icon.

Ubuntu13-10-5

That’s it. You can now type in Japanese in Ubuntu 14.04. お疲れさまでした。
Japanese Input on Fedora 20 Linux Heisenbug

Friday, December 27th, 2013

Setting up Japanese input IME (日本語入力方法) on Fedora 20 Linux under the Gnome 3 environment is quick and easy, and can even be done during the initial setup process. It is the same method as the previous Fedora 19 release.

This quick tutorial will show you how to set up Japanese input.

Japanese IME Setup Procedure

To start, open Activities from the Top Panel.

In the Search Box, type Region & Language and select Region & Language.

fedora19-1

On the Input Sources section of the Settings screen, press the + in the lower left corner to add a new keyboard input source.

fedora19-2

On the Add an Input Source screen, select Japanese.

fedora19-3

On the next Add an Input Source screen, select Japanese (Kana Kanji).

fedora19-4

Press Add.

Close the Region & Language menu.

You should now have the input language menu in the top bar. The en displayed means English keyboard.

fedora20-1

Press it and select Japanese (Kana Kanji) to change to Japanese Input.

fedora20-2

The en should have changed to a katakana あ to indicate Japanese input.

fedora20-3

That’s it. You can now type in Japanese.

fedora18-8

Press the katakana あ in the top bar while in Japanese input mode to toggle between various input modes and typing methods.

fedora20-4

For previous versions of Fedora, refer to:

Japanese Input on Linux Mint 16 Petra (Cinnamon)

Wednesday, December 4th, 2013

This tutorial will show you how to install Japanese input IME (日本語入力方法) in Linux Mint 16 under the Cinnamon desktop environment. Japanese IME is required to be able to type in Japanese. It is pretty easy to get working, so let’s start.

Click on the Mint Menu and select Software Manager from the left menu.

Linux Mint 16-1

linuxmint15-2

In the Enter your password to perform administrative tasks dialog box, enter your system password and press OK.

In the Software Manager, search for ibus.

linuxmint15-3

Select ibus by double clicking it.

linuxmint15-4

Click Install.

Linux Mint 16-2

Software Manager will now download and install IBus in the background.

linuxmint15-5

While IBus is installing, search for anthy.

linuxmint15-6

Select ibus-anthy by double clicking it and click Install.

Linux Mint 16-4

Software Manager will now download and install ibus-anthy in the background.

When the activity bar on the bottom shows 0 ongoing actions, installation is complete.

linuxmint15-15

Close Software Manager.

From the Mint Menu, select to System Settings – Control Center.

linuxmint15-8

Open Languages.

linuxmint15-9

If you get the dialog box that says The language support is not installed completely, select Install to install them now.

In the Authenticate dialog box, enter your system password and press Authenticate.

On the Language tab of the Language Support screen, select Install / Remove Languages….

Scroll down and check Japanese, and then press Apply Changes.

The Applying changes popup screen will display. Wait for it to finish applying changes. It may take a few minutes.

On the the same screen, press the Keyboard input method system: drop down and select IBus.

linuxmint15-10

Then press Close.

Log out of the desktop and log back in for the changes to take effect.

Linux Mint 16-6

After logging back in, you should now see the IBus keyboard icon in the bottom tray.

Linux Mint 16-7

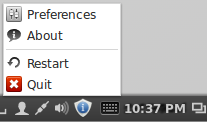
Right click the IBus keyboard icon and select Preferences.

Linux Mint 16-8

On the IBus Preferences screen, go to the Input Method tab.

Select the Customize active input methods check box.

Press the Select an input method dropdown and select JapaneseAnthy.

Press Add on the IBus Preferences screen to add the Anthy Japanese input method.

Press Close to exit the IBus Preferences screen.

Now when you click the IBus keyboard input method icon you can select Anthy.

Linux Mint 16-9

Linux Mint 16-10

Anthy is now activated. The IBus icon will now change to the Anthy Aち icon, indicating that you can type in Japanese.

That’s all there is to it. Now you can type in 日本語.

Note: Sometimes the input method reverts back to English if you are changing back and forth between windows and applications. Just toggle back to Anthy if this happens by using the IBus keyboard input method icon again.

Japanese Input on openSUSE Linux 13.1 (KDE)

Wednesday, November 20th, 2013

This quick tutorial will show you how to set up Japanese input IME (日本語入力方法) on openSUSE Linux 13.1. Once installed and configured, you will be able to type in Japanese in your Linux applications. The process is similar to previous versions of openSUSE.

Setup Procedure

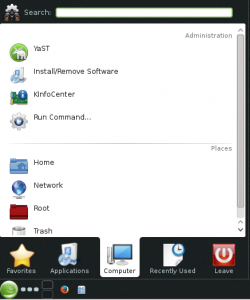
Click on the Kickoff Application Launcher.

openSUSE13-1-1

On the Computer tab, click Install/Remove Software.

openSUSE13-1-2

On the Search tab, search for anthy.

In the search results window showing the matching packages, select the anthy and ibus-anthy packages.

Press the Accept button on the bottom right of the window.

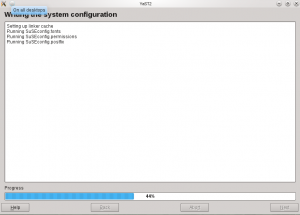
YaST will now download, install, and configure the anthy packages.

Do the same for ibus. Open Install/Remove Software, search for ibus, and select the package for ibus. Press Accept to install.

Click on the Kickoff Application Launcher, and from the Leave tab, click Restart to restart openSUSE with the new configuration.

openSUSE13-1-3

After restarting, log back in.

You will now have the IBus input method framework keyboard icon in the bottom panel.

openSUSE13-1-4

Right click the IBus input method framework keyboard icon and click on Preferences.

openSUSE13-1-5

On the Input Method tab, click Customize active input methods, and then select Japanese → Anthy from the dropdown menu.

openSUSE13-1-6

Press the Add button to add Japanese Anthy input method, and then press Close.

openSUSE13-1-7

Open up a text editor or any application with a text input window, and click on the IBus input method framework icon and select Japanese – Anthy.

openSUSE13-1-8

You can now type in Japanese.

openSUSE13-1-9

Click the Anthy Aち icon to select between the various Japanese input modes.

openSUSE13-1-10

That’s it. Setting up Japanese input on openSUSE 13.1 is not very difficult. When you try to type Japanese, make sure the cursor is in a text box in an application, or you may get an error saying No input window.

Japanese Input on Ubuntu Linux 13.10 Saucy Salamander

Sunday, October 20th, 2013

This tutorial will show you how to set up Japanese input IME (日本語入力方法) on Ubuntu Linux 13.10 from the Unity interface so you can type in Japanese in all your favorite Ubuntu applications. The installation procedure is a bit different from the previous Ubuntu 13.04 release.

Setup Procedure

To start, select Dash home from the Unity Launcher.

ubuntu13-04-1

From the Dash home, search for Language Support.

ubuntu13-04-2

Select Language Support.

ubuntu13-04-3

Note: If you get the language support is not installed completely dialog box at this point, press Install to install them now.

ubuntu13-04-4

On the Language tab of the Language Support screen, press Install / Remove Languages…

On the Installed Languages screen, scroll down to Japanese and check Installed, and then press Apply Changes.

Enter your password on the Authenticate screen.

It will take a few moments to download and install the Japanese IME packages.

Back on the Language Support screen, select IBus for the Keyboard input method system, and then press Close.

ubuntu13-04-5

For these settings to go into effect, you must log out and log back in.

Ubuntu13-10-6

After logging back in, click the language icon from the top panel and select Text Entry Settings…

Ubuntu13-10-1

On the Text Entry screen, click the + icon on the button left of the Input sources to use area.

ubuntu13-10-2

On the Choose an input source screen, scroll down and select Japanese (Anthy).

ubuntu13-10-3

Press Add.

The Japanese Anthy input method will now be available from the language icon in the top panel.

Open up any application with a text box such as gedit and place the cursor in the text box.

Press the language icon on the tap panel and select Anthy.

Ubuntu13-10-4

The language icon will now change to the Anthy Aち icon.

Ubuntu13-10-5

That’s it. You can now type in Japanese in Ubuntu 13.10. お疲れさまでした。