Archive for November, 2011

ALC Advanced Search Options (英辞郎 on the Web)

Wednesday, November 23rd, 2011

Space ALC (英辞郎 on the Web) is one of the most useful Japanese translation tools on the Internet. It is a translation dictionary and translation memory that can be searched in both Japanese and English. It has everything from highly technical terminology to colloquial spoken slang. The key feature that separates ALC from all the other online dictionaries is the huge set of example sentences it has in its database. Whether you are looking up a word or phrase, ALC returns results for what you looked up as well as in-context example sentences.

ALC has many advanced search options similar to search engines like Google that you can use to refine your search queries. Let’s take a look at some of these search options.

Basic Search Options

And Search (Word1 Word2)

Search for phrases containing two or more search terms in the results. The search results will contain all the search terms.

Instructions: Put a space between each search term to be included in the search result.

Example: 野球 サッカー

Example: up down

Or Operator [Standalone] (Word1 | Word2)

Search for phrases containing one or more search terms in the results. The search results will contain at least one of the search terms.

Instructions: Put a | (vertical bar) between the search terms.

Example: 製造装置 | 製造設備

Example: USPS | FedEx

Or Operator [Within Phrase] (Word1 | Word2)

Search for different variations of phrases containing one of the terms in the parenthesis.

Instructions: Put a | (vertical bar) between the search terms that are inside of ().

Example: (ケーキ|ピザ)を食べます

Example: do (one’s | my | your | his | her | its | our | their) best

Exact Phrase Search (“Phrase”)

Search for an exact phrase.

Instructions: Put the phrase within double quotes “”.

Example: “open source software”

Advanced Search Options

Designating Number of Words In Between (Word {#} Word)

Specify a certain number of words between search terms.

Instructions: Put the number of words you want to appear between words in braces. For a specific number of words, put one number, like {2}. For a range of possibilities, put the end limits in braces, like {1,3}.

Example: make {2} request

This example will find phrases like make a personal request that have two words between make and request, but will not find phrases like make a request that only have one word in between.

Example: thank you {2,4} cooperation

Search All Conjugations ([Word])

Search for all variations of an English word such as verb conjugations and plurals, etc.

Instructions: Put the variable word in brackets [].

Example: “[go] the distance”

This example finds all forms of the word go, including the past tense went the distance. Notice we put the entire search query in quotes to find the full phrase.

Example: [take] pictures of

This example fines take, takes, taking, took, etc.

Terms to Exclude (-Word)

Exclude certain translations from your search results. Useful to narrow your focus when there are multiple translations for a word.

Instructions: Put a dash – before the word to exclude.

Example: サッカー -soccer

This example will find examples of the word 「サッカー」 that exclude the American translation of soccer, and finds those examples that use football instead.

Example: diet -国会

This example will exclude the Japanese governmental body the Diet. This is useful if you are looking for food and diet related translations.

Multiple Search Options

You can combine search options for really advanced search queries.

Example: “[take] (my | our | your | his | her) picture -can”

This example uses the exact phrase quotes, the conjugation search [], the or operator within a phrase, and the not operator to remove phrases containing the word can.

Searching ALC can often find hundreds of translations. These advanced search options are easy to use and can help narrow down what you are looking for.

For more information, refer to the ALC Help – Basic Usage, Help – High Level Usage, and Search Tips pages. These ALC help pages are all in Japanese.

Japanese Input on Fedora 16 Linux (Gnome 3)

Saturday, November 12th, 2011

Setting up Japanese input (IME) on Fedora 16 Linux is really easy and only takes a few minutes.

Fedora still uses the IBus keyboard input method system and uses the Anthy Japanese input method for the Japanese keyboard input, so it will be a familiar process to set up and use if you have done it on earlier Fedora Linux distributions.

For previous versions of Fedora, refer to:

Fedora 16 Japanese IME Setup Procedure

To start, open Activities from the Top Panel.

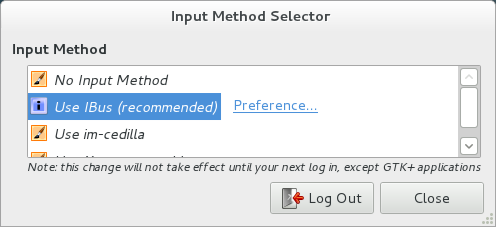
In the Search Box, type Input Method and select the Input Method Selector.

In the Input Method Selector screen, select Use IBus (recommended).


Press the Preference… link to the right of Use IBus (recommended) to open the IBus Preferences screen.

On the Input Method tab, check the Customize active input methods check box.

Press the Select an input method dropdown and select Show all input methods.

Press the Select an input method dropdown once again and now select Japanese → Anthy.

Press the Add button, and then press Close.

You must log out for the changes to take effect, so press the Log Out button on the Input Method Selector screen.

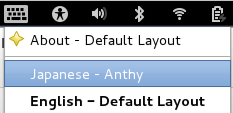
When you log back in you will now have the IBus input method framework button on the Gnome top panel (It looks like a small keyboard). This is the button to change input modes. Open a text editor such as gedit or some other application with a text input window.

Press the IBus input method framework button and select Japanese – Anthy.

The keyboard icon has now changed to Aち, which shows the letter A and the hiragana character chi, which probably is trying to get something close the the pronunciation of Anthy while indicating Japanese/English input modes.

You should now be able to type in Japanese.

Use the Anthy Aち button to toggle between Japanese, English, and other Japanese IME modes.

Note: I did not have to log out and log back in for the changes to take effect to allow me to type in Japanese in Firefox. However, there may be applications that cannot take advantage of the IME changes until after logging out.

Note: If you get the message No input window when you try to select Japanese Anthy, make sure you have the mouse cursor in an application with a text input box, such as a text editor or a Web browser.

That’s it. You should be able to type in Japanese now. Setting up Japanese IME input on Fedora Linux is simple and very similar to previous versions of Fedora.

Localizing a CakePHP Application

Thursday, November 10th, 2011

If you build a PHP application using the CakePHP framework, it is easy to localize the application into multiple languages, provided you have the proper translations for those languages. If you want to internationalize your application to a global market, it is important to localize it for each language and region you want to target.

Fortunately, CakePHP and PHP itself provide us with some easy mechanisms to provide translations and localize our code without much effort. You do not have to make copies of HTML or PHP files. Everything will be done with the PHP files you already have, and the translated text strings will dynamically be inserted at render time, ready for the user in their localized language and format.

In this example, we will localize a CakePHP application that was written in English into Japanese. Let’s assume we have a menu for e-mail functions that we want to localize. This example assumes CakePHP version 2.0 (But earlier and perhaps later versions of CakePHP will work in a similar manner).

Wrapping Translatable Text in __() Functions

The first step in the localization process is to identify the text strings that will need to be translated, and replace them with CakePHP’s localized string __() function. Supposing our menu looked like the following:

<ul>
   <li>Send</li>
   <li>Reply</li>
   <li>Forward</li>
   <li>Delete</li>
</ul>

We would wrap each text string inside the __() function like as follows:

<ul>
   <li><?php echo __('Send') ?></li>
   <li><?php echo __('Reply') ?></li>
   <li><?php echo __('Forward') ?></li>
   <li><?php echo __('Delete') ?></li>
</ul>

The __() function identifies these strings as translatable text that will differ by language locale and uses the text within the __() function as the message ID. If we define the translations for a certain language, those translations will appear in place of these functions. If we do not define the translations for that language, the text within the __() function will display instead by default.

Creating the Localized PO Files

The next step is to create the PO files which will contain the translations for each language to be dynamically inserted in each of the __() functions. CakePHP has two ways you can do this: automatically using the console shell; or manually.

Using the I18N Shell

CakePHP has some console shell programs that you can run on the command line, including one to generate the PO file to use as the original language source file for translations. In our case it will be a file with all the English text strings.

To run the i18n shell command, type the following on the Linux command line in your CakePHP application directory:

./Console/cake i18n extract

Then follow the onscreen menu.

The shell command will examine all of your application files for instances of the __() function and generate a PO file for the original source language that you can use to create the PO files for each of the translations you are going to use.

Creating the PO Files Manually

If you want to do this manually—for example you don’t have many translatable text strings like in our example—you can create the PO files by hand in a text editor.

First we will create the original source language English version here:

/app/Locale/eng/LC_MESSAGES/default.po

The default.po file will have this format:

msgid "ID"
msgstr "STRING"

Where msgid is the ID within the __() function; msgstr is the localized translation that should appear as output.

Our full English source PO file will look like this:

msgid "Send"
msgstr "Send"

msgid "Reply"
msgstr "Reply"

msgid "Forward"
msgstr "Forward"

msgid "Delete"
msgstr "Delete"

To create the Japanese localized version, we copy the English PO file to the Japanese directory, and then replace the English strings in the msgstr field with the Japanese translations. (If you have a large application being localized into dozens of languages, it is at this point that you send the PO files to a language service provider to translate the localized strings.)

Our localized PO file with Japanese translations will go here:

/app/Locale/jpn/LC_MESSAGES/default.po

Our final localized Japanese PO file will look like this.

msgid "Send"
msgstr "送信"

msgid "Reply"
msgstr "返信"

msgid "Forward"
msgstr "転送"

msgid "Delete"
msgstr "削除"

That’s it. The translations for English and Japanese will display appropriately for the proper locale. If you want to add translations for other languages, you do the same process and put the new PO file in the directory that corresponds with that language code. CakePHP uses the ISO 639-2 standard for naming locales. Follow that standard for naming your localized directories. Make sure you save these files at UTF-8.

Detecting and Changing Languages and Locales

Having the translations ready is nice, but you still have to detect and change to the proper language in your PHP code to get the translations to appear. Detecting the user’s language is tricky. You could do it in JavaScript or try to use something like the following PECL function:

locale_accept_from_http($_SERVER['HTTP_ACCEPT_LANGUAGE']);

In either case, you have to trust the user agent to report back the right language.

Another option is to simply have a button or menu for the user to select their language. Flag icons usually work well for this. Then you can set the language manually. In CakePHP it is easy to do with the CakeSession class:

CakeSession::write('Config.language', 'jpn);

Finally, you also have to set the locale in PHP. Since you already know this from however you determined the language above, you can use PHP’s setlocale function to do this. This is important for localization of date, time, money, and numeric separator formats among others.

setlocale("LC_ALL", "ja_JP.utf8");

That’s all there is to localizing a CakePHP application with proper translations and other locale-specific customizations.